
There are often so many budget categories to consider and one of the worst things I dislike about having disorganized finances other than having no clue what’s going on, is having to deal with late fees and similar consequences.
Late fees are the worst because it’s unexpected money leaving your pocket. A solution I found to avoid disorganized finances and unnecessary late fees is to create bill calendar.
A bill calendar is just what it sounds like, a calendar that reminds you when bills and other important financial obligations are due. It’s a super easy way to organize your finances and instead of having to purchase products online or from the store, I’m going to show you how to set up your own personal and private bill calendar with Gmail.
Step 1: Set Up a Gmail Account
Your first step is to set up a Gmail account. Most people already have Gmail accounts but in this case, you might want to create a brand new account just for the purpose of your bill calendar and I’ll explain why later.
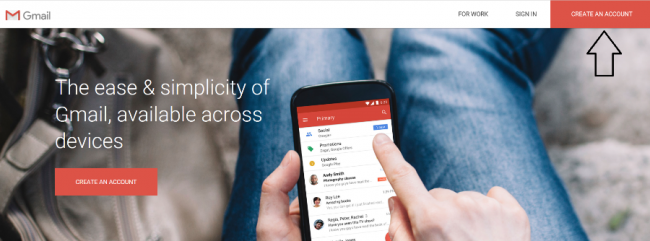
To create your free email, just go to Gmail.com and click on the ‘Create an Account’ button in the upper right corner. You’ll want to create an email specific to your bills and finances that are easy to remember like: marybills@gmail.com.
Step 2: Change the Contact Email for All Your Financial Accounts
Once you’ve set up your new email with Gmail, you’ll need to change your contact email for all your important accounts so messages will start to come to your new email. When your bank, credit card companies, lenders, etc. all try to contact you or send you email reminders, they should all go to your bill email with Gmail.
Having everything go to one place will help you a lot with organization and reduce the chances of you missing an important email about your finances. I have quite a few personal emails and one of them is out of control with tens of thousands of emails.
If I relied on that email address alone for updates on my different financial accounts, odds are, I’d probably miss out on a few important emails every month since it’s so easy for them to get buried when newer messages come in.
Step 3: Set Up Your Calendar
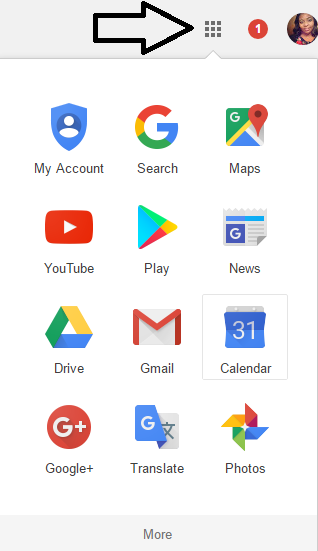
One of the best benefits of having a Gmail account is being able to take advantage of all the free features and perks like their Calendar function for example. When you log into your account, you’ll need to click on the icon in the upper right corner that looks like 9 small squares. Once you click on that, a drop down will appear and you’ll need to select ‘Calendar’.
Selecting the Calendar option will open up an additional tab where you can create ‘events’ or reminders for the due dates on your bills and other important dates. In order to set a reminder in the Calendar, you just need to click on one of the time blocks on a specific day and name the event.
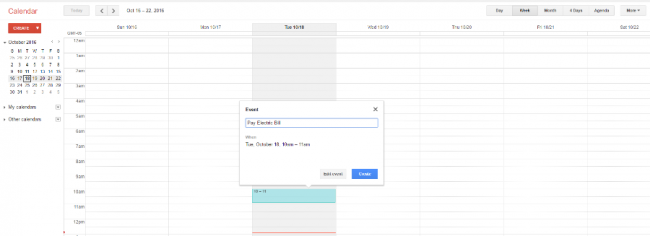
Changing the date and time is easy, and if you want to create more specific details for the event you can always click on the time block you created and select ‘Edit Event’ which will take you to a screen that looks similar to the one below.
Step 4: Edit Your Event Reminder
This step is highly recommended if you want to add more specific details, set up recurring reminders each month, and streamline the process of maintaining your bill calendar. Once you click on ‘Edit Event’ you can make a variety of changes to your event reminder. If you are paying a bill online, you can paste the website address into the ‘Event Location’ or ‘Description’ category along with any numbers you might need to call.
In the event description section, you can add specific details like questions or concerns you need to bring up or something you need to follow up with along with a confirmation number after you’ve made a payment. I always try to jot down the confirmation number after I make a payment over the phone but I usually have trouble keeping up with them so storing them digitally on your bill calendar is a great option.
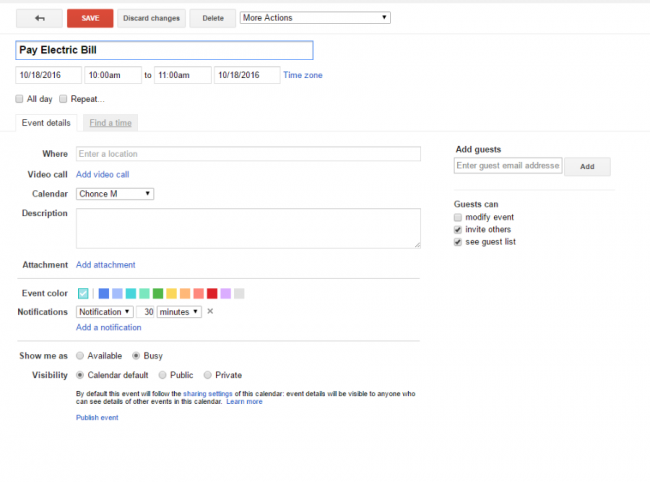
You can also invite other people to receive a reminder too which is a great tool to utilize if you pay bills with your spouse or partner or share expenses with a roommate. Finally, if your bill or expense is recurring, you can click the ‘Repeat’ button to set up an automatic recurring reminder so you never make a late monthly payment again.
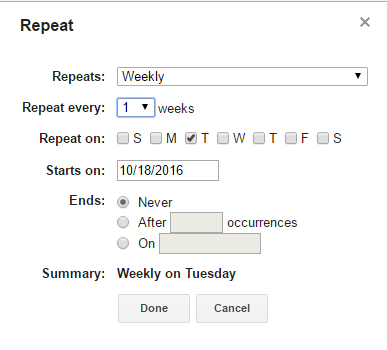
After you set everything up, don’t forget to click the ‘Save’ button and you’ll receive a reminder email at the time and day you specified to remind you about which bills you need to pay.
Why Use a Google Calendar Instead of an App?
There are quite a few personal finance budgeting apps that will allow you to set bill payment reminders, so why should you use a Google calendar? Well for starters, a Google calendar is easy and you’ll have the option to actually manage your own email address designated to all your financial accounts which will only make things much more organized.
You can sort all your confirmation and update emails in folders via Gmail.
Plus, you can receive reminders on your phone as well when you’re on the go. You just need to make sure you have the Gmail app on your phone and you’re logged in. With budgeting apps, I find that they do an okay job of reminding users when their bills are due but some of them don’t have the option to set up recurring reminders.
With Gmail’s Calendar function, you can set a reminder in the morning and the evening if you want to make sure you don’t forget to do something.
Most apps also send a lot of promotions via email as well which could cloud up your inbox if you aren’t interested. I’ve had Gmail for several years and I’ve never had a problem with receiving excessive and distracting emails and promotions from them.
All in all, setting up a free bill calendar with your Gmail account is an easy way to manage your finances and make sure you start on track with paying your bills, debt, and other expenses.
Do you have a bill calendar? How do you stay organized with paying your bills on time?

1 comment
I haven’t used a bill calendar but think the idea is great. Knowing what is coming out, when it’s due etc is a huge part of getting finances sorted.